In iOS App there is sometimes a need to store the data locally on the device. This data might be simple key value pair, or a slightly bigger more managed structured data, all the way to sometimes having a need to store some data remotely with ease
There are couple of ways we can store this data locally but each of the methods have their own benefits and limitations.
User Defaults
This is a key value store, it is a fundamental mechanism in iOS development that allows you to store small pieces of data persistently. This data can be used to maintain user preferences, settings, or any other lightweight, user-specific information.
Generally used to store user preferences about the app like mode, brightness, theme name, color, last state etc.
The data is stored in a .plist file locally which is visible to anyone who wants to look at it in the file system.
The data is loaded from storage when app launches, so if this file is too big, it will impact loading times of app.
import Foundation

let defaults = UserDefaults.standard

defaults.set(90, forKey: "ScreenBrightness")
let screenBrightness = defaults.integer(forKey: "ScreenBrightness")
print("Screen Brightness: \(screenBrightness)")

defaults.set("WorldEnder Vindicator", forKey: "AvatarName")
let avatarName = defaults.string(forKey: "AvatarName") ?? "None"
print("Avatar Name: \(avatarName)")

OUTPUT
#######
Screen Brightness: 90
Avatar Name: WorldEnder Vindicator
if you open the local file in a editor the data is visible
Keychain
This is a very similar storage as UserDefaults, but the contents of this store is encrypted and backed up in apple cloud.
The API is slightly different but there are many 3rd party packages which make the API very similar to UserDefaults.
Custom object in UserDefaults
This is a mechanism to store more structured / nested data in the datastore. It saves the information in same plist file, The data is encoded during writes and decoded during reads. It has the same pros and cons as UserDefaults.
import Foundation

class Course: Codable{
    var name: String = ""
    var description: String = ""
}
let courseIn = Course()
courseIn.name = "Science"
courseIn.description = "Sometimes science is more art than science"

let coursesDataFilePath = FileManager.default.urls(for: .documentDirectory, in: .userDomainMask).first?.appendingPathComponent("Courses.plist")
print("Courses are stored at \(String(describing: coursesDataFilePath!))")

let encoder = PropertyListEncoder()
do {
    let data = try encoder.encode(courseIn)
    try data.write(to: coursesDataFilePath!)
}catch {
    print ("Error encoding course: \(error)")
}

if let data = try?Data(contentsOf: coursesDataFilePath!) {
    let decoder = PropertyListDecoder()
    do {
        let courseOut = try decoder.decode(Course.self, from: data)
        print ("Course out -> {Name: \(courseOut.name), Description: \(courseOut.description)}")
    } catch {
        print ("Error decoding course: \(error)")
    }
}
OUTPUT
#######
Courses are stored at file:///Users/atomar/Library/Developer/XCPGDevices/70D5BB57-2707-46A2-B6F4-18E6E79B82F1/data/Containers/Data/Application/B5CB7049-CF89-4822-9C4F-BFF7BEC54A37/Documents/Courses.plist
Course out -> {Name: Science, Description: Sometimes science is more art than science}
If you open the plist file you can see the data we store there


CoreData
This is the next level of storage, it is backed by a SQLite engine, which means we can have relationships between entities, we can filter results using where clause and so forth.
To work on this you have to add CoreData module to your app, and define the model name. You can then open the Data model in Xcode editor and add entities and their attributes (tables/columns). You can also define relationship like One to many etc. between the entities.


Behind the scenes Xcode generates a swift file for each entity
(base) atomar@SJ-1101280-M:~/Library/Developer$ cat ./Xcode/DerivedData/localStorageApp-dvipbvrzgfxsjdcqvtesjrtogreg/Index.noindex/Build/Intermediates.noindex/localStorageApp.build/Debug-iphonesimulator/localStorageApp.build/DerivedSources/CoreDataGenerated/DataModel/Course+CoreDataClass.swift
//
//  Course+CoreDataClass.swift
//
//
//  Created by Amit Tomar on 1/28/24.
//
//  This file was automatically generated and should not be edited.
//

import Foundation
import CoreData

public class Course: NSManagedObject {

}

(base) atomar@SJ-1101280-M:~/Library/Developer$ cat ./Xcode/DerivedData/localStorageApp-dvipbvrzgfxsjdcqvtesjrtogreg/Index.noindex/Build/Intermediates.noindex/localStorageApp.build/Debug-iphonesimulator/localStorageApp.build/DerivedSources/CoreDataGenerated/DataModel/Course+CoreDataProperties.swift
//
//  Course+CoreDataProperties.swift
//
//
//  Created by Amit Tomar on 1/28/24.
//
//  This file was automatically generated and should not be edited.
//

import Foundation
import CoreData

extension Course {

    @nonobjc public class func fetchRequest() -> NSFetchRequest<Course> {
        return NSFetchRequest<Course>(entityName: "Course")
    }

    @NSManaged public var courseDescription: String?
    @NSManaged public var name: String?

}

extension Course : Identifiable {

}
you can read write from the SQLite DB using the following example code
func testCoreData() {

    let context = (UIApplication.shared.delegate as! AppDelegate).persistentContainer.viewContext

    let courseIn = Course(context: context)
    courseIn.name = "Science"
    courseIn.courseDescription = "Pure Science"

    do {
        try context.save()
    } catch {
        let nserror = error as NSError
        fatalError("Unresolved error \(nserror), \(nserror.userInfo)")
    }

    do {
        let courses = try context.fetch(Course.fetchRequest()) as? [Course]
        if let courseOut = courses?[0] {
            print ("Courses fetched-> Name: \(courseOut.name), Description: \(courseOut.courseDescription)")
        }
    } catch {
        print("error-Fetching data")
    }
}

//Initialize connection
lazy var persistentContainer: NSPersistentContainer = {
    let container = NSPersistentContainer(name: "DataModel")
    container.loadPersistentStores(completionHandler: ){ (storeDescription, error) in
    if let error = error as NSError? {
        fatalError("Unresolved error \(error), \(error.userInfo)")
        }
    }
    return container
}()

func saveContext () {
    let context = persistentContainer.viewContext
    if context.hasChanges {
        do {
            try context.save()
        } catch {
            let nserror = error as NSError
            fatalError("Unresolved error \(nserror), \(nserror.userInfo)")
        }
    }
}

OUTPUT
#######
Courses fetched-> Name: Optional("Science"), Description: Optional("Pure Science")
The fetch request can be enhanced here using NSPredicate to add where clauses to the get call.
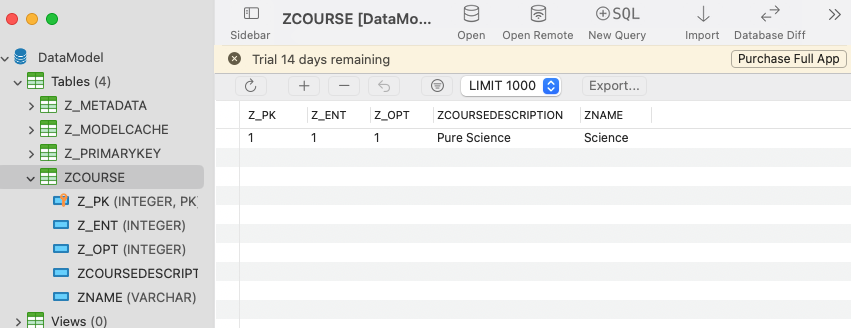
If you want to open the sqllite file where the data is actually stored, you can find it on your drive and open using a sqllite IDE which will look something like below


FireStore
Google provides a cloud based service to store structured data remotely and securely. This also provides a functionality to create user accounts on the cloud using multiple authentication models. You will need to create a google account and create a firestore DB on firebase.google.com and download a GoogleService-Info credentials file to connect to the service. Then add a Swift package for firestore in your project for this to work.
import FirebaseCore
import FirebaseAuth
import FirebaseFirestore

let email = "test@test.com"
let password = "MySuperSecretPassword1$"
print ("Creating user")
Auth.auth().createUser(withEmail: email, password: password) { authResult, error in
    if let e = error {
        print ("Error creating user: \(e)")
    }
}
print ("Logging in user")
Auth.auth().signIn(withEmail: email, password: password) { [weak self] authResult, error in
    if let e = error {
        print ("Error logging in user: \(e)")
    }
}
print ("Authenticating logged in user before proceeding")
if let currentUser = Auth.auth().currentUser {
    printContent(("User signed in with email: \(currentUser.email!)"))
} else {
    fatalError("User not logged in")
}
let db = Firestore.firestore()
db.collection("Students").addDocument(data: ["firstName": "Rick", "lastName": "Sanchez", "quote": "I'm Pickle Rick"]) { (error) in
    if let e = error {
        print ("Error saving Student: \(e)")
    } else {
        print ("Successfully saved data")
    }
}

db.collection("Students").getDocuments { querySnapshot, error in
    if let e = error {
        print ("Error getting Student: \(e)")
    } else {
        if let snapshotDocs = querySnapshot?.documents {
            for doc in snapshotDocs {
                let student = doc.data()
                if let firstName = student["firstName"] as? String, let lastName = student["lastName"] as? String, let quote = student["quote"] as? String {
                    print ("Got student from DB-> Name:\(firstName) \(lastName), quote: \(quote)")
                }
            }
        }
    }
}


do {
    try Auth.auth().signOut()
} catch {
    print ("Error signing out user: \(error)")
}

OUTPUT
#######
Test Start firebase
Creating user
Logging in user
Authenticating logged in user before proceeding
Successfully saved data
Got student from DB-> Name:Rick Sanchez, quote: I'm Pickle Rick
Test End firebase
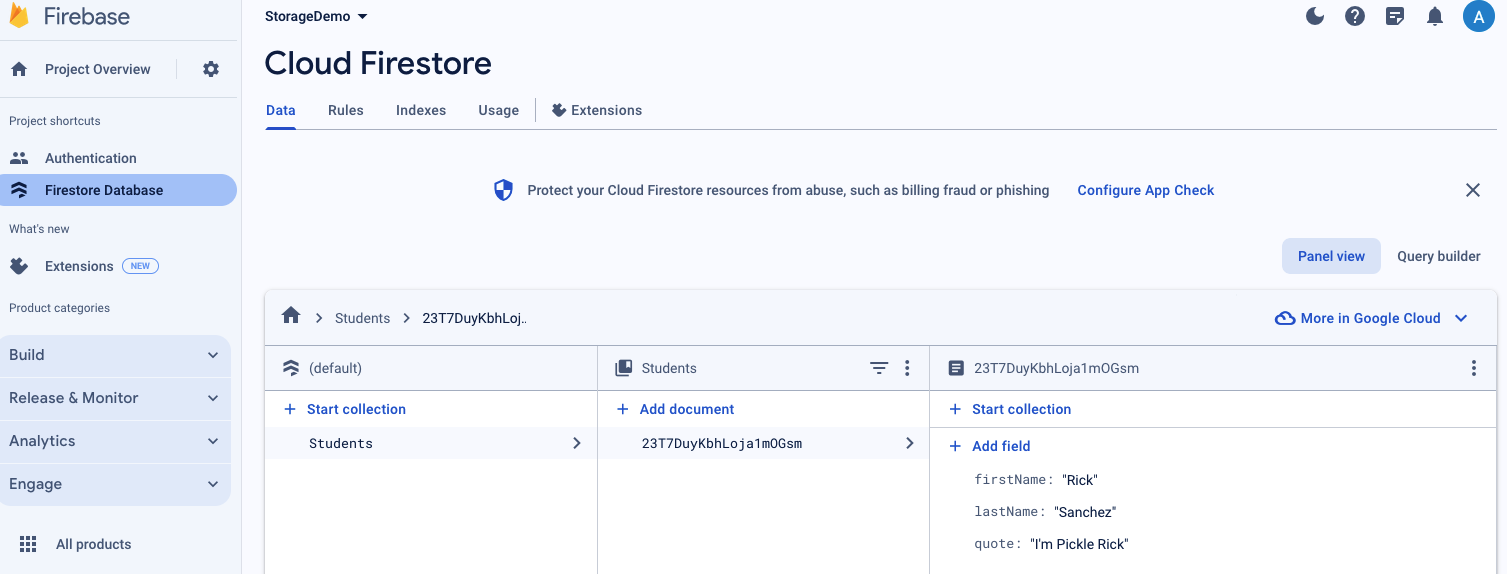
You can go to fire store UI and see the authentication data (encrypted)


You can also see the stored data there


Cheers!! – Amit Tomar


